Christmas Lights, 105ft 300 LED 8 Modes Solar String Lights Waterproof Fairy Tree Lights for Garden, Patio, Fence, Balcony, Outdoors (Multicolor)
Selling fast! 51 people have this in their carts.
HURRY UP! SALE ENDS IN:
Guarantee Safe Checkout
Delivery: $2.99 or Free (if ordering $39+), Fast delivery: 6-15 business days, 72.8% delivered within 7 business days.
Wholesale more than 10 items, contact sales to get discounts.Package tracking, all links are guaranteed by standardized processes

Christmas Lights, 105ft 300 LED 8 Modes Solar String Lights Waterproof Fairy Tree Lights for Garden, Patio, Fence, Balcony, Outdoors (Multicolor)
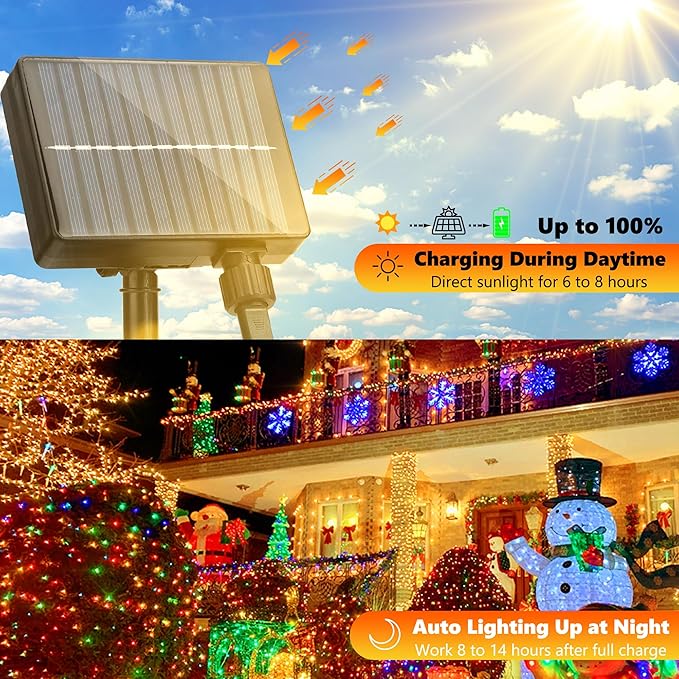
Solar Power: This Christmas string light is powered by solar energy, so there are no extra utility costs and no need to replace batteries.
Auto On/Off: The light sensor controls the solar string lights charging during the day and turning on at night automatically.
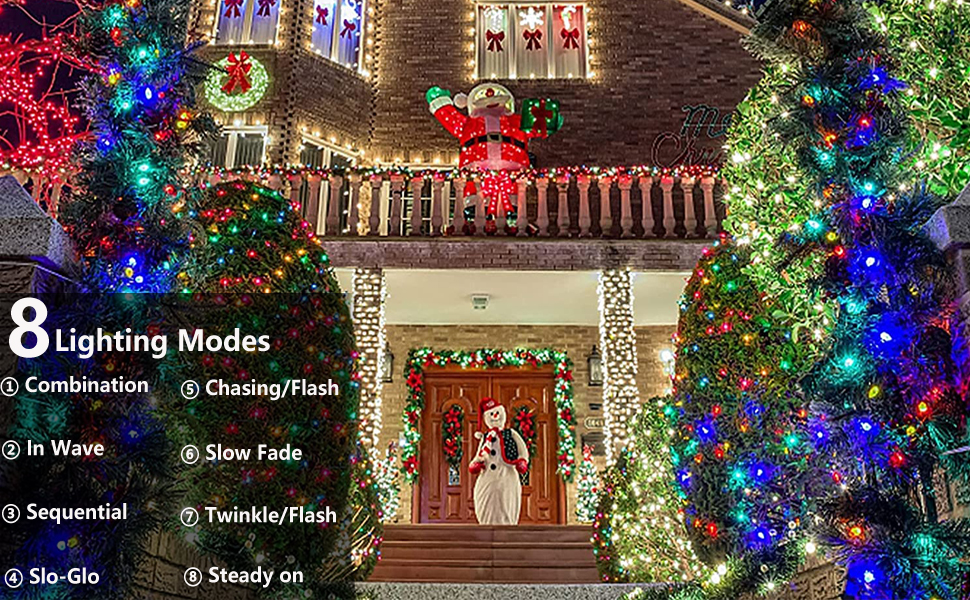
Variety of Modes: With 8 different lighting modes, you can customize the look of your Christmas lights to suit your needs.
Waterproof: The solar string lights are IP65 rated, so they can withstand rain, snow, and other weather conditions.
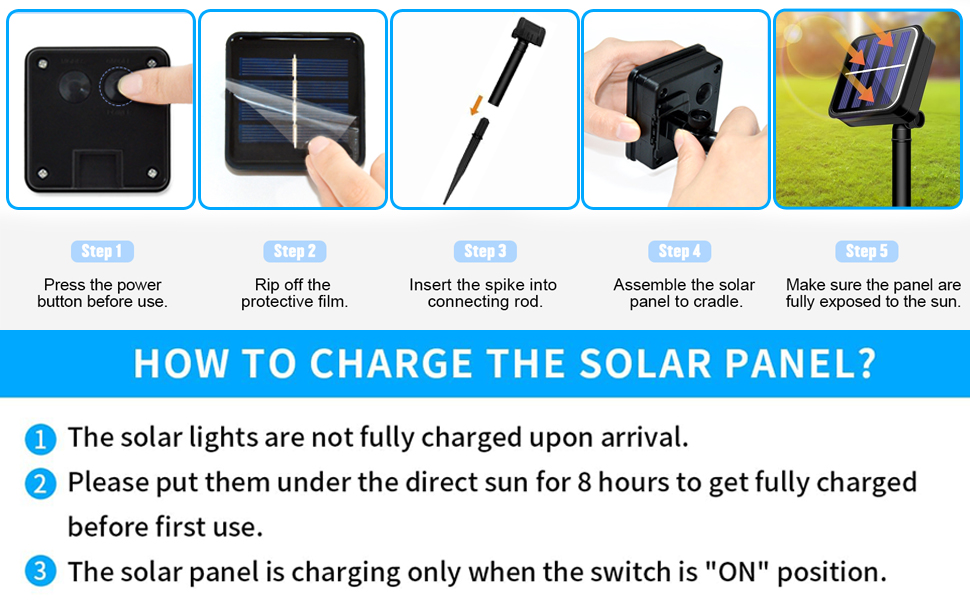
Easy Installation: The solar panel comes with a ground stake and the string light is 105 feet long, making it easy to wrap around trees or other outdoor decorations.


How do check the string lights work during the Daytime?
A. Completely cover the solar panel, and the String Lights will light up.
B. If not, Leave the Solar Panel in the sun for an hour and then completely cover the solar panel again and it should light up.
Make sure that the solar panel is NOT sheltered from the sun, because it needs to absorb enough energy from the sun.
It is ONLY designed to be protected from rain. Please do NOT immerse it in the water.
The solar string lights have a memory function. It will return to your previous setting when you turn it off and turn it on again.
The solar panel is with light sensor feature ,so that the string lights can automatically turn off at dawn and turn up at dusk.


The Quick Way - 5 Easy Steps
Step 1
Rinse a teapot, small teacups and a small pitcher with hot water.
Step 2
Put one tablespoon of tea leaves in the teapot for every two people being served. Use more for large leaf tea or for a stronger taste.
Step 3
Place the tea leaves inside the teapot and pour in enough hot water to cover the leaves. Pour out the water immediately to rinse the leaves. Use to this chart for proper water temperatures.
Green TeaSilver Needle White Teasand most tea made from “tips” |
75C – 80C
|
Taiwan OolongTips Red/Black Teas |
90C – 95C
|
Black TeasPu-Erh (Bow-Lay)Te Guan Yin (Iron Buddha)Da Hong Pao (Cliff Tea)Lapsang SouchongPhoenix OolongAged White Teas |
95C – boiling
|
IMPORTANT NOTES:
-
Too much or too little heat for the tea you are making will break down the leaves too quickly or too slowly and the flavour will be inconsistent. Temperatures can be approximate.
-
*Boiling means when the water has just reached a slow boil with big bubbles. The Chinese call this “Fish-Eye Water”. For green tea, watch for small streams of tiny bubbles starting to rise from the bottom of the kettle. This is called “Crab-Eye Water”.
-
For Oolong teas, the correct temperature is somewhere between these two. If you do not have a thermometer, let the water stand for 2 minutes or so after reaching a first boil to get 90 – 95C C / 194 – 203 F.
Step 4
Empty the teacups and pitcher. Pour enough hot water into the teapot again to cover the leaves. Wait 8 - 10 seconds and pour the tea into the pitcher and serve, a little longer for a stronger taste. For additional brews, repeat Step 4, deducting two seconds for the second brew and adding two seconds for each additional brew.
Step 5
As the aromatic compounds in the tea leaves dissolve in the water, you will notice the subtle flavours of the tea begin to change with each brew. You will be amazed at the difference! To make tea taste even better, try making tea using Gong Fu Cha method, the traditional Chinese art of tea-making.
The Traditional Way Using The Gong Fu Cha Method
You will need:
-
Teapot - preferably a small Chinese Yixing teapot. These have the best heat handling properties for tea-making, as well as for developing the flavour. If you only have a large teapot, use the quantities of water as if a small teapot and tea shown on the charts.
-
Small teacups (similar in size to Japanese sake cups) or tiny bowls
-
Kettle
-
Pitcher - small glass or porcelain
-
Fine Strainer - to keep your tea clear and free of sediment
-
Tea Tray - A cookie sheet or large flat dish lined with a towel can make a good tray to prepare your tea on.
Step 1 - Warm The Teapot and Pitcher, Sterilize The Teacups and Strainer
The first step is to use the right size of teapot for the number of people you are serving. Most teas taste best when made using a Yixing unglazed clay teapot. Use this chart for the correct size of teapot for the number of people you are serving (use this amount of water if you are using a larger teapot). Pour some hot water into the teapot, pitcher, teacups and over the strainer to rinse, warm and sterilize them.
Size of Teapot |
Volume(ml / fl oz) |
Number of People Served |
#1 size |
70 / 2.4 |
1 - 2 |
#2 |
100 / 3.4 |
2 - 4 |
#3 |
175 / 6.0 |
3 - 5 |
# 4 |
225 / 7.6 |
4- 6 |
Referring to this chart, determine the correct water temperature for the type of tea you are making. Too much or too little heat will break down the leaves too quickly or too slowly and the flavour will be inconsistent. Temperatures can be approximate.
Green TeaSilver Needle White Teasand most tea made from “tips” |
75C – 80C
|
Taiwan OolongTips Red/Black Teas |
90C – 95C
|
Black TeasPu-Erh (Bow-Lay)Te Guan Yin ( Iron Buddha)Da Hong Pao (Cliff Tea)Lapsang SouchongPhoenix OolongAged White Teas |
95C – boiling
|
* Boiling means when the water has just reached a slow boil with big bubbles . The Chinese call this “Fish-Eye Water”. For green tea, watch for small streams of tiny bubbles starting to rise from the bottom of the kettle. This is called “Crab-Eye Water”.
For Oolong teas, the correct temperature is somewhere between these two. If you do not have a thermometer, let the water stand for 2 minutes or so after reaching a first boil to get 90 – 97C C / 194 – 206 F.
Step 2 – Rinse The Tea Laves
Empty the teapot and pitcher of the warming water. Place the measured amount of tea into the teapot using this chart and fill with the proper temperature water from the chart above. When pouring water in, allow the water to overflow the top of the teapot until the bubbles disappear and the water runs clear.
Size
|
Size of Leaves |
|||
Rolled Leaves
|
Less than 1 cm / 3/8 inches |
1 – 2 cm
|
2 - 4 cm
|
|
#1 size |
0.5 - 1 |
0.5 - 1 |
1 – 1.5 |
1.5– 2 |
#2 |
1.5 - 2 |
1.5 - 2 |
2 – 2.5 |
2.5 – 3 |
#3 |
3 – 3.5 |
3 – 3.5 |
3.5 – 4 |
4 – 4.5 |
# 4 |
4 – 4.5 |
4 – 4.5 |
4.5 – 5 |
5 – 5.5 |
This chart shows the amount of tea to use (in number of tablespoons) based on the size of the tea leaves you are using and the size of teapot. Adjust for personal taste.
Replace the lid and immediately pour off all the water (or a bit longer if using compressed tea) and shake out the last drops. Then tilt the lid slightly open on the teapot. This allows the heat in the teapot to escape and not “cook” the leaves so they can retain their aroma
Step 3 –The First Brew
Fill the teapot until the water flows over the top. Place the lid on the teapot and count the proper number of seconds using this chart. Adjust times to taste.
|
|
Rolled Leaves
|
Less than 1 cm / 3/8 inches |
1 – 2 cm
|
2 - 4 cm
|
Rinse the leaves |
4 - 8 seconds |
pour off the tea as quickly as possible |
1- 3 seconds |
2 - 4 seconds |
First Brew |
10– 15 seconds |
1 – 2 seconds |
9– 12 seconds |
2 – 15 seconds |
Second Brew |
8– 13 seconds |
2– 4 seconds |
8– 10 seconds |
10– 13 seconds |
Third Brew |
6– 10 seconds |
4– 6 seconds |
6–8 seconds |
8– 10 seconds |
Fourth Brew |
4– 10 seconds |
4– 6 seconds |
6– 8 seconds |
8– 10 seconds |
Fifth Brew |
6– 12 seconds |
8– 8 seconds |
8– 10 seconds |
10– 12 seconds |


